Overview
After you have picked a sales order or branch transfer, you pack and dispatch those items with WMS.
You can choose what orders and items you are packing and then dispatch the orders with your shipping integration.
You will need to set up either your Starshipit, ShipStation, or Shiptheory integrations before you can dispatch your orders with them.
Select orders for packing
- Orders can be selected by scanning a packing slip or by using the search field.
- If Tote Picking is enabled, the search field defaults to tote numbers. Totes can be selected by scanning a tote number or using the search field.
- The search field defaults to OrderRef.
- Selected orders appear under Items to Pack.
Pack FIFO products
- Scan or select a product under Items to Pack.
- Select the plus sign for each item as it is packed.
- Items appear under Items Packed.
When all items are packed, the Ship Order window will pop up. Enter a carrier and tracking code if required, and select Submit Order.
Pack batch or serial products
For Paperless processing:
- A batch or serial number appears with orders under “Items to Pack”.
- Select the plus sign for each item being packed.
For Paper-based processing:
- Enter the required batch or serial number when prompted.
- The number is validated against the actual stock to ensure the correct number is applied.
Items will appear under Item Packed.
Pack partially picked orders
If all items have not been picked for an order, a message appears on the Ship Order popup to advise not all items have been picked and packed for the order.
- An option is given to complete the packing process with currently available items.
- If proceeding to pack the order, a message advises that a backorder will be created for the unpicked items.
- All picked items are marked as Dispatched in the original order.
Shipping integration orders and labels
Warehouse Management integrates with ShipStation, Shiptheory, and Starshipit. You will need to connect your shipping integration to Cin7 Omni (Starshipit, ShipStation, and Shiptheory) and then set up the integration with WMS.
- When all items are packed, the Ship Order window will pop-up.
- The order weight will be the combined weight of all the items but you can type in a new weight.
-
ShipStation
Choose the ShipStation Carriers, Services, and Packages. -
Shiptheory
Choose the Shiptheory Packages.
If you have Show Delivery Services enabled, you can choose Shiptheory Services. -
Starshipit
Choose the Package option. You can set up your package options in the Cin7 Omni Starshipit integration settings.
-
ShipStation
- Select Submit Order. Orders from Amazon Business will show a warning if the delivery is outside of business hours.
- The PDF of the label will open in a new browser tab and can be printed. You may need to turn off your pop-up blocker.
- The sales order is confirmed as shipped and will be updated with carrier and tracking code information in Cin7 Omni.
Shipping without an integration
You can ship an order without using a shipping integration. This can be useful for click and collect orders, or if you are organizing delivery directly with the customer.
- When all items are packed, the Ship Order window will pop-up.
- Tick the Dispatch without shipping integration checkbox.
- You can add the order weight, the carrier, and the tracking code for your order. These are optional fields. The carrier and tracking code details will be updated on the Cin7 Omni sales order.
- Select Submit Order. You will not be able to create any labels as they require a shipping integration.
- The sales order is marked as dispatched back in Cin7 Omni.
Pack and ship with cartonization
With cartonization, you can pack a single order into multiple packages and print an SSCC label for each one. Turn on cartonization in your Packing settings.
Pack an order into multiple packages
You can create multiple packages for the items in your order when packing.
- Select an order to pack.
- Select + Add package.
-
Select the package you want to add items to. When you scan or increase the quantity for an item, it is added to the selected package.
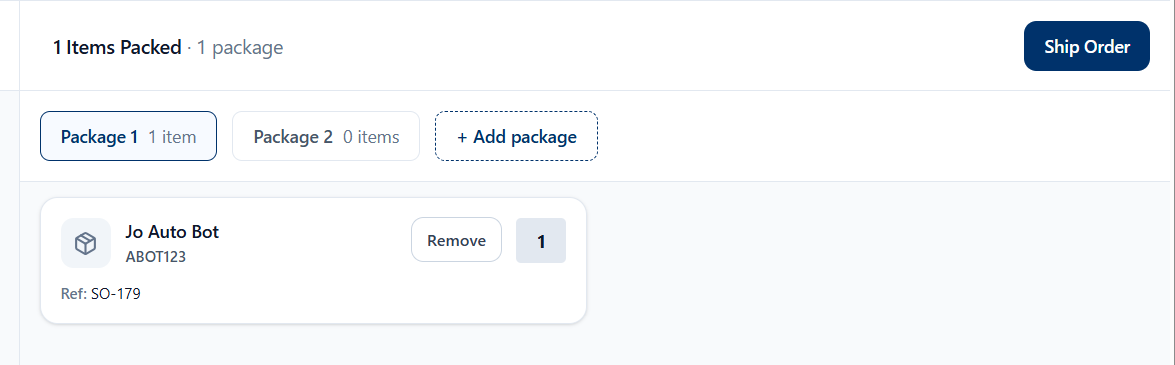
- Select Remove to take an item out of the package.
Scan package barcodes
You can create packages for an order, or switch between packages, by scanning a barcode. Package barcodes need this format: C7CTN-# (for example, C7CTN-2080). The format supports up to 20 digits.
When you scan, WMS assigns the barcode to Package 1. Each additional unique barcode creates a new package with that code. To switch between packages, scan the relevant package barcode. When you then scan items, they are added to the selected package.
Print SSCC labels
You can print the serial shipping container code (SSCC) labels for each package.
- When you have completed packing, select Ship Order.
-
Select Print SSCC labels. This option only appears if you use EDI or 3PL.
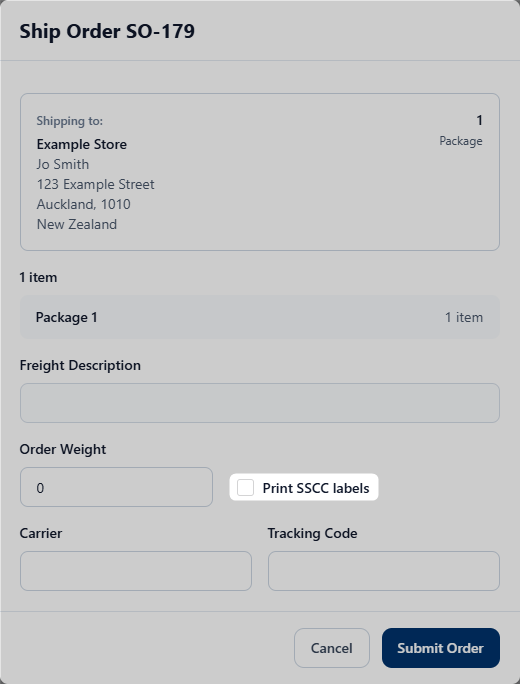
- Enter your other shipping information and then select Submit Order.
- A new tab opens with the SSCC labels, ready for you to print.
If the labels fail to appear, you can print them from Cin7 Omni.
The SSCC labels open in a new browser tab, so you must allow pop-ups in your browser. If pop-ups are blocked, the labels can't open and you can't generate them at all.