Overview
ForesightAI settings are now in Cin7 Omni. Choose your strategy, refine supplier, branch, and product settings, automate settings with product rules, and adjust your forecast from one ForesightAI Settings page, without leaving Cin7 Omni.
This update is available only to accounts in the ForesightAI settings Early Adopter Program (EAP). Your existing settings have been imported from the ForesightAI app, so your forecasts and reorder suggestions continue as before.
Open ForesightAI settings
From the navigation, open General settings > ForesightAI Settings. Or, in Smart Reorder or the sales forecast graph, click Settings.
How your settings work
What's changed
Each group of settings from the ForesightAI app now has its own tab:
| ForesightAI app | ForesightAI Settings |
|---|---|
| Product segmentation (strategy) | Product Strategy Also, the Profit strategy is now Gross Margin |
| Suppliers | Suppliers |
| Warehouses | Branches |
| Edit Arena | Products and Product Rules |
| Forecast adjustments | Forecast Adjustments |
Settings priority
Some settings, like lead time and reorder period, can be set in more than one place, like for a supplier or branch, in a product rule, or on an individual product. When a product has more than one value for the same setting, ForesightAI uses the most specific one, in this order:
- The product's own setting on Products
- A matching product rule on Product Rules
- The supplier or branch setting, depending on how the product is replenished
- A default value, like a lead time of 1 day or a purchase order period of 7 days
Saved changes reach your forecasts, reports, and Smart Reorder suggestions after the next sync, approximately every 24 hours.
Product strategy
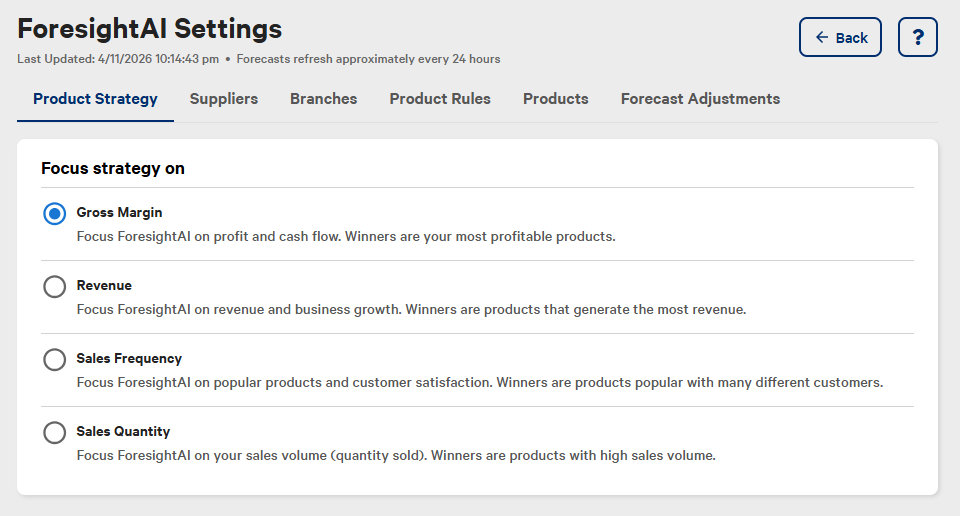
Your strategy defines what matters most to your business. It decides which products are Winners, Losers, and Chasers, and guides forecasts and Smart Reorder suggestions. On Product Strategy, choose from four options:
- Gross Margin — focus on profit and cash flow. Winners are your most profitable products
- Revenue — focus on revenue and business growth. Winners are products that generate the most revenue
- Sales Frequency — focus on popular products and customer satisfaction. Winners are products popular with many different customers
- Sales Quantity — focus on sales volume. Winners are products with high sales volume
Changing your strategy affects all ForesightAI calculations, including reports, sales forecasts, and Smart Reorder.
Suppliers
Supplier settings help Smart Reorder suggest the right amounts at the right time. On Suppliers, you can set these for each supplier:
- Minimum Order ($) — the minimum spend per order. Smart Reorder suggests more products from the supplier to meet it
- Set Period and Lead — Automatically lets ForesightAI calculate the purchase order period and lead time from your history. Manually lets you enter them yourself
- Purchase Order Period (days) — how often you order from the supplier. If no value is available, ForesightAI uses 7 days
- Lead Time (days) — how long an order typically takes to arrive. If no value is available, ForesightAI uses 1 day
Edit values in the table, then click Save.
The supplier's Purchase Order Period and Lead Time apply to all products replenished by that supplier, so you don't have to set them for each product individually. You can override these values with product rules or individual product settings.
You can also:
- Search suppliers and filter them by modified values or by automatic or manual period and lead time
- Select suppliers and click Bulk Edit to update them together
- Export supplier settings
Branches
Branch settings control how stock moves between your branches and where it's produced. On Branches, you can set these for each branch:
- Branch Hierarchy — drag and drop branches to set which branches supply which. A branch's parent sets the Parent Branch for its products in Products
- ForesightAI — include (Active) or exclude (Inactive) the branch from ForesightAI forecasts, reports, and suggestions
- Transfer Lead Time — how long a transfer to this branch typically takes
- Transfer Period — how often stock is transferred to this branch
- Production — mark the branch as a production location (Yes or No)
- Production Lead Time — how long production typically takes at this branch
- Production Period — how often production runs at this branch
Edit values in the table, then click Save.
For root-level branches (branches with no parent), you can't set Transfer Lead Time or Transfer Period. Products replenished by a supplier use that supplier's Lead Time and Purchase Order Period instead.
Products
Product settings give you control over each product at each branch. Each row is one SKU at one branch. Product settings take priority over all other settings.
Products are split into two views. SKUs shows the products you buy and sell. BOMs shows the products you make from a bill of materials (BOM), along with where they're produced.
On Products, you can set:
- ForesightAI — include (Active) or exclude (Inactive) the product at this branch. Inactive products have no forecast
- MOQ and Packing Qty — the minimum order quantity and the order increment
- Available for Order — set to No to keep forecasting the product without suggesting reorders
- Min Inventory, Max Inventory, and Max Days for Stock — your stock targets and limits
- Reorder Period and Lead Time — product-specific values that override supplier settings, branch settings, and product rules
- Replenished By — restock from a Supplier or by Redistribution from another branch. BOMs can also be replenished by Production, which is their default
- Smart Reorder Suggestions — how reorder quantities are calculated: Automatic, Use Sales Forecast, Use Minimum Inventory, or Use Customer Orders
- Predecessor — link a new product to an existing product, so ForesightAI can forecast the new product using the existing product's sales history
Edit values in the table, then click Save.
You can also:
- Search and filter products, including by modified values and active or inactive status
- Create custom Filters
- Select products and click Bulk Edit to update them together
- Export product settings
Product rules
Product rules apply settings automatically to every product that matches your conditions, including products you add later. Create rules instead of updating products one by one:
- Open Product Rules.
- Click New Rule.
- Enter a Name and choose the Rule Type: SKUs, BOMs, or SKUs and BOMs.
- Under IF Condition, choose a parameter (like Branch, Category, Supplier, Brand, or Product) and a value.
- Click + Add Condition to add more conditions with And or Or.
- Under THEN Result, choose the setting to apply (like MOQ, Lead Time, or Reorder Period) and its value.
- Click + Add Result to set more than one setting.
- Click Save Rule, review the products affected, and click Save.
Your new rule goes to the top of the list with a Priority of 1, so it takes priority over your existing rules.
- When a product matches more than one rule, the rule higher in the list applies.
- To change the order, drag a rule to a new position. Your rules are renumbered, and the new order saves straight away. You can only drag rules when the list is sorted by priority.
You can also:
- See each rule's details and its Affected Products
- Edit and delete rules
Forecast adjustments
Forecast adjustments let you factor in what your history can't predict — a planned promotion, a known seasonal spike, or a period to exclude.
To create an adjustment:
- Open Forecast Adjustments.
- Click New Adjustment and choose a type:
- Change in % — a fixed percentage increase or decrease over a period
- Trend in % — a percentage change that compounds each month
- Change in Quantity — a set quantity for specific products, month by month
- Configure and save your adjustment.
For Change in % and Trend in %, choose the Product, Category, or Branch to adjust, set Date from and To (optional), enter the Value %, and add an optional Note. Then click Save Adjustment.
For Change in Quantity, choose an adjustment type, then enter a value for each product and month:
- Total — replaces the forecast for that month with your value
- Difference — adds or subtracts your value from the forecast
Select Show Formula to see each calculation. Then click Save.
You can also:
- View current, past, or all adjustments, and filter by product, branch, category, brand, or supplier
- Edit and delete adjustments